Usage#
Task-oriented guide. Each section starts with the shortest path and goes deeper afterwards. If a term is unfamiliar, the Concepts page defines it.
How a team uses ZagalaSpec#
        flowchart LR
    S["Stakeholders<br/>designers, producers, QA, tech leads"] -- "write scenarios<br/>(text file or Feature Editor)" --> F[("Feature asset")]
    C["Configurator<br/>technical designer / QA engineer"] -- "match sentences to steps,<br/>fill in captured values" --> F
    P["Programmer<br/>Blueprint or C++"] -- "add missing steps,<br/>connect to gameplay" --> F
    F -- "runs as automation tests" --> R["Session Frontend / CI"]
    R -- "green / red + reason" --> S
    R --> C
    R --> P
Stakeholders create user stories that describe the desired behavior of the game/product using examples.
Stakeholders write or review scenarios in plain Given / When / Then sentences.
A configurator makes sure every sentence is understood by an existing step and fills in the captured values.
A programmer adds a step when no existing one fits (see 7. Create a new step in Blueprint and 8. Create a new step in C++).
Everyone reads the result in the Session Frontend or the CI report.
Dive Deeper into User Stories
Write a feature#
Option A: write a text file and import it#
Best when stakeholders work outside Unreal, or when you already have specifications in another tool.
Write the feature in any text editor. Templates for every supported format are in the installed plugin under
Resources/Templates/(GherkinTemplate.feature,SpecFlowTemplate.feature,RobotFrameworkTemplate.robot,GaugeTemplate.spec,FitNesseTemplate.wiki). The bundled examples underSource/ZagalaSpecExamples/Features/(Counter.feature,Inventory.zagalaspec,Hoverboard.zagalaspec,Checkpoint.zagalaspec,Networking.zagalaspec) are complete, working features.In the Content Browser, right-click and select the Import to Current Folder button or drag the files onto the Content Browser. ZagalaSpec registers itself for
.feature,.robot,.wiki,.spec,.cptand.zagalaspec. You can also right-click the destination folder and choose Import Feature File… without showing the preview dialog.Review the Import Feature — Preview dialog. It lists every feature, scenario and step it found, plus warnings and errors, and lets you change the destination path. Press Import.
Open the new Feature asset and check that each step shows a Matched Step Entry (see Configure steps).
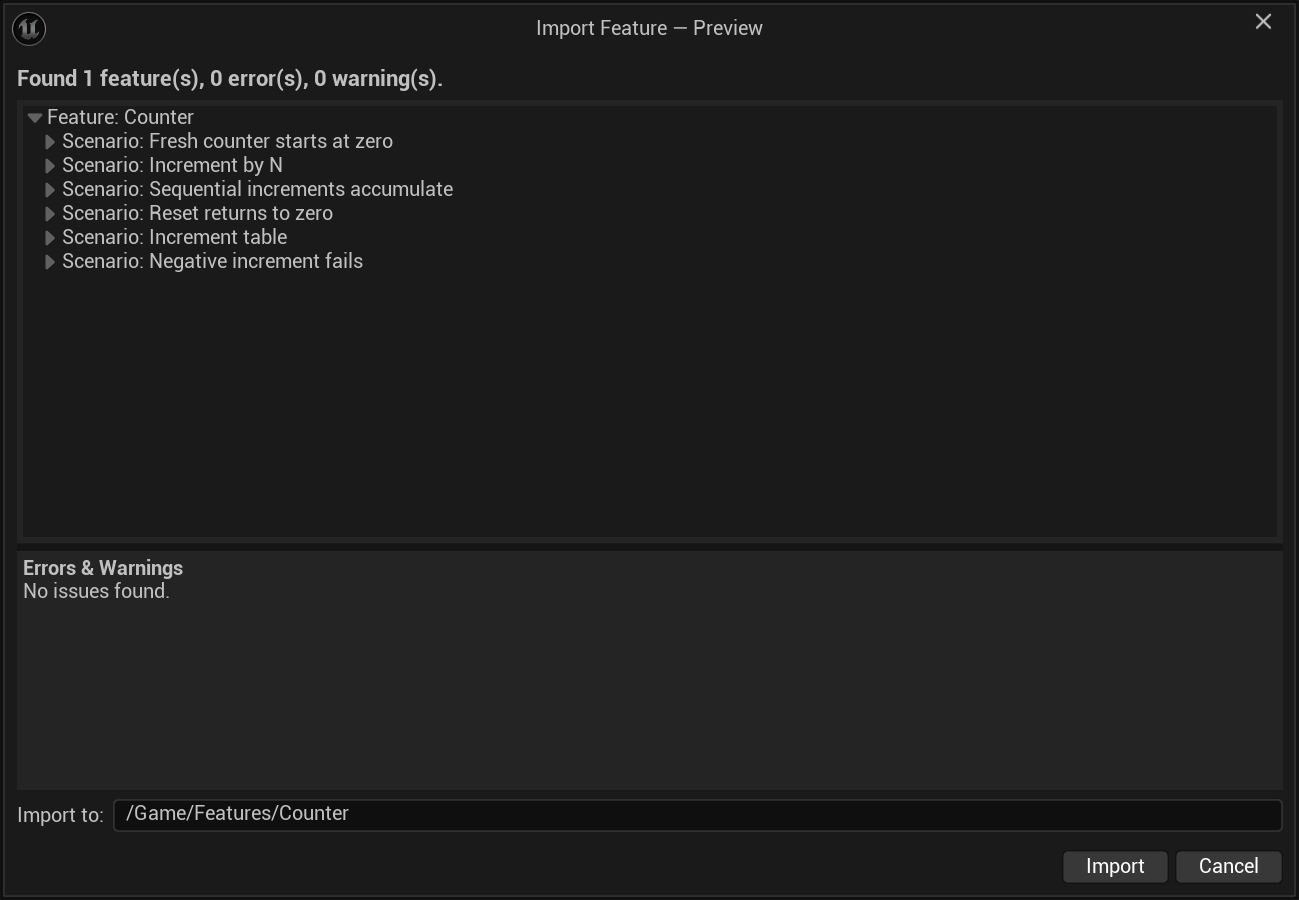
Imported features get a gameplay tag under ZagalaSpec.Import.Features.<FeatureName> and each scenario …<FeatureName>.<ScenarioName>; these are the names you will see in the Session Frontend.
Format support#
Import is best-effort for formats other than ZagalaSpec’s own. Every parser keeps the parts that map onto features, scenarios and steps and warns about the rest in the preview dialog and the Output Log.
Gherkin / SpecFlow |
Robot Framework |
Gauge |
FitNesse |
ZagalaSpec |
|
|---|---|---|---|---|---|
Feature + description |
yes |
yes ( |
yes |
yes |
yes |
Scenarios + steps (Given/When/Then/And/But/*) |
yes |
yes (Test Cases) |
yes |
Script Table only |
yes |
Background / shared setup |
yes |
|
steps before first scenario |
no |
|
Per-scenario setup |
no |
no |
no |
no |
|
Scenario Outline + Examples |
becomes one scenario + examples iterator |
|
no |
no |
no (use an iterator step) |
Tags |
yes |
|
stored in description |
no |
yes |
Rule |
flattened into the feature |
||||
Not imported (warning) |
non-English |
|
Decision Tables; one scenario per page |
missing |
Warning
Only the .zagalaspec format round-trips without loss (except for configurations of capture groups and filter tags). Data tables, doc strings, Robot keywords, Gauge concepts beyond simple inlining and FitNesse decision tables are either simplified or dropped. Always read the preview dialog’s warning list before importing.
The .zagalaspec grammar is Gherkin plus three section keywords:
@ZagalaSpec.Import.Features.Inventory
Feature: Inventory
  Free-text description.

  Shared Context Extensions:
    Given a fresh empty inventory

  @ZagalaSpec.Import.Features.Inventory.GlobalCaptureFlowsAcrossSteps
  Scenario: Global capture flows across steps
    Context Extensions:
      Given I focus on item "Sword"
    Expectations:
      When I add 3 of that item
      Then the inventory has 3 of "Sword"

  Scenario: Local captures in a single step
    When I add 10 of "Arrow" directly
    Then the inventory has 10 of "Arrow"
A scenario without Context Extensions: lists its steps directly. A scenario with Context Extensions: must also have Expectations:. A tag line before Feature: or Scenario: sets its identifier; a (disabled) tag excludes it from tests.
Option B: create the feature in the editor#
In the Content Browser, Add > Miscellaneous > Data Asset, pick ZagalaSpec Feature Asset, name it.
Double-click it. The ZagalaSpec Feature Editor opens with a Feature tab (the document: feature header, shared context extensions, scenarios) and a Details tab for whatever line is selected.
Select the feature header. In Details set Identifier (a gameplay tag, for example
MyGame.Features.Doors) and Description (the user story).Add a scenario with the + button of the Scenarios array. Select it, set its Identifier (a child tag,
MyGame.Features.Doors.OpensWhenUnlocked).Add steps with the + button of Expectations (and Context Extensions for setup). Each new step is a text step: type the sentence in Definition. Switch the Step type to Native Step when you want to bind a class directly.
Press Check in the scenario’s Details to run that scenario once and see the result inline, then save.
To change the order of scenarios or steps, select the feature (for scenarios and shared context extensions) or the scenario (for context extensions and expectations) and use the up and down arrow buttons next to an element in its array. The order of the array is the order in which scenarios and steps appear in the document, run, and export. Undo restores the previous order.
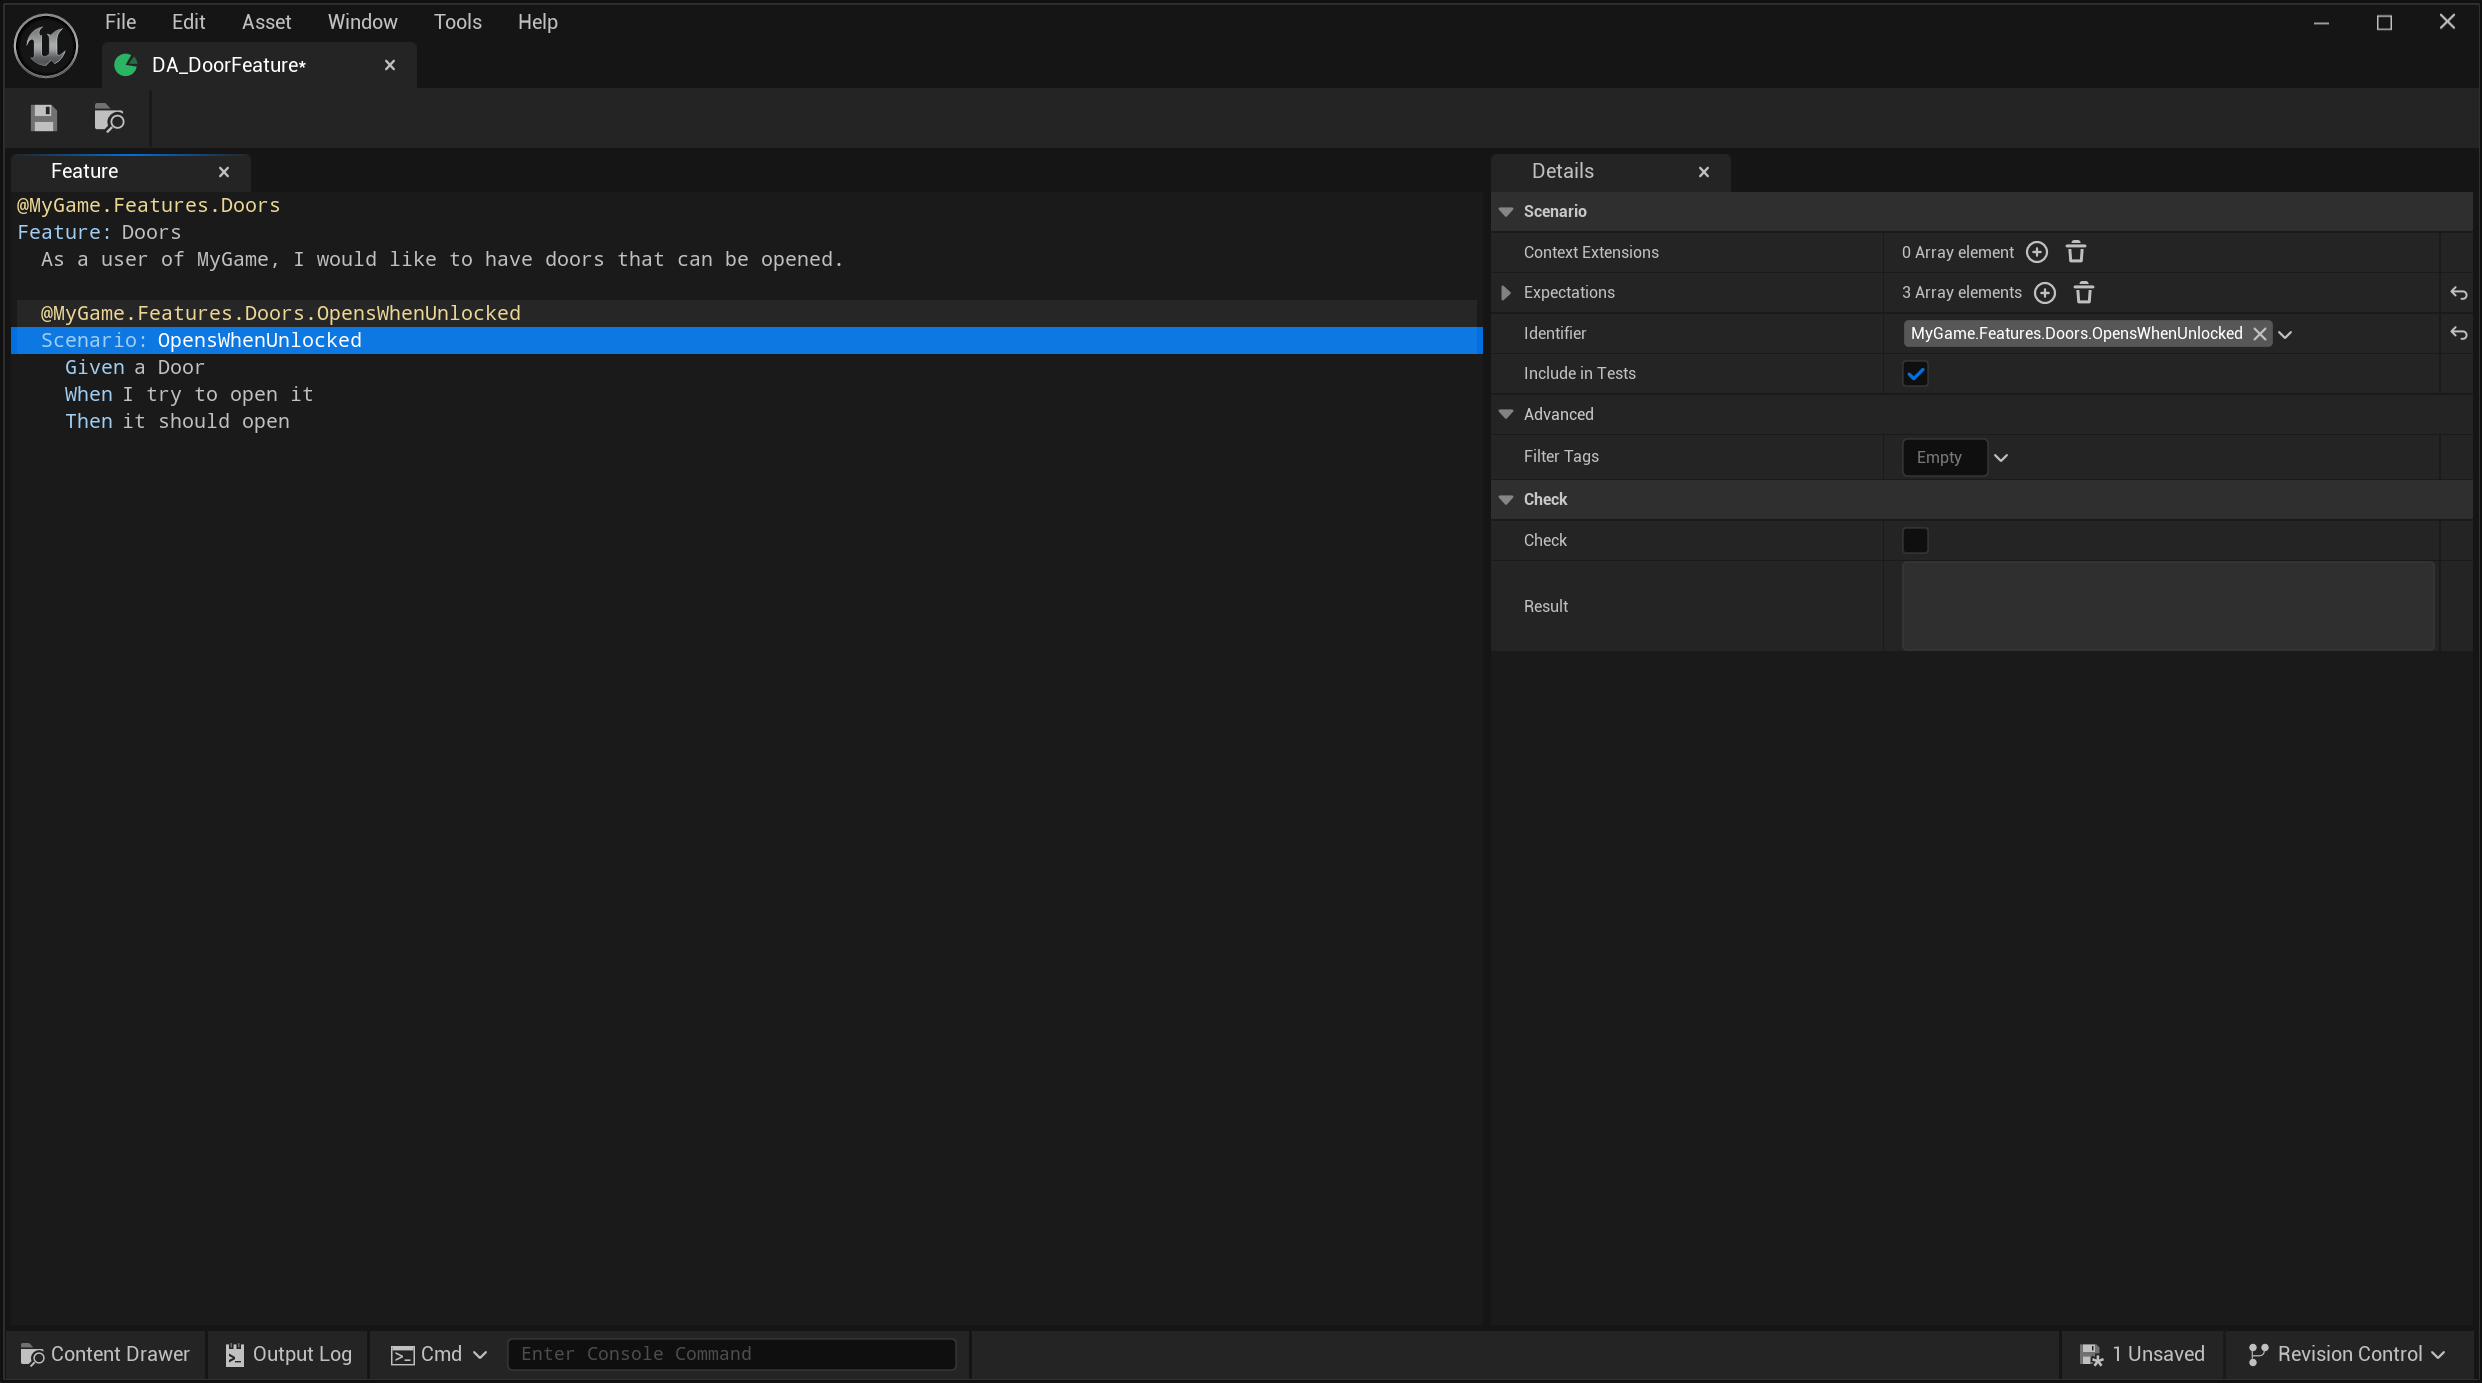
Saving the feature registers its scenarios; they appear in the Session Frontend after a refresh.
Keep your features in a project plugin#
Features are test content, so most teams keep them out of shipping builds. A small plugin inside your project’s Plugins folder gives them a home of their own: they are cooked for every build that runs tests and left out of Shipping entirely. ZagalaSpec itself is excluded from Shipping the same way.
In the editor, open Edit > Plugins > Add and create a Content Only or C++ plugin, for example
ProjectSpecs. Create your feature assets under Plugins > ProjectSpecs Content.Edit the plugin’s
.upluginso it depends on ZagalaSpec, holds content, and is denied in Shipping:{ "FileVersion": 1, "Version": 1, "VersionName": "1.0", "FriendlyName": "Project Specs", "Description": "Project-specific ZagalaSpec features. Not shipped.", "Category": "Testing", "CanContainContent": true, "Installed": false, "TargetDenyList": [ "Shipping" ], "Modules": [ { "Name": "ProjectSpecs", "Type": "DeveloperTool", "LoadingPhase": "Default" }, { "Name": "ProjectSpecsEditor", "Type": "Editor", "LoadingPhase": "Default" } ], "Plugins": [ { "Name": "ZagalaSpec", "Enabled": true } ] }
TargetDenyListis what removes the plugin, its code and its content from Shipping. The module types only decide which builds compile the code: DeveloperTool for step code that runs in tests, Editor for editor-only code. A content-only plugin has noModulessection; keepTargetDenyListand thePluginsentry.Features are found through the registry rather than referenced by your game, so the cooker does not pick them up on its own. Add the plugin’s content to the always-cook list in your project’s
Config/DefaultGame.ini:[/Script/UnrealEd.ProjectPackagingSettings] +DirectoriesToAlwaysCook=(Path="/ProjectSpecs")
/ProjectSpecsis the plugin’s content mount point (its name), not a folder on disk. Use the project’sDefaultGame.ini; aGame.iniplaced inside a plugin’s ownConfigfolder is not guaranteed to be applied to the packaging settings.Package a Development build and confirm the features run, then package Shipping and confirm
/ProjectSpecs/content is absent from the cooked output.
Note
Do not make shipping game code or content depend on the plugin. Anything that references it would fail to load in Shipping, where the plugin is not enabled. Features may reference your project’s assets; the dependency only points from the plugin to the project.
Reuse the ZagalaSpec Toolkit#
ZagalaSpecToolkit is a C++ module that ships with the plugin. It holds the building blocks the bundled examples are made of, so your own steps can reuse them instead of rewriting them. It builds on the core ZagalaSpec module and does not depend on the examples. You do not need it to write or run features from the editor; it is for programmers who add their own steps.
What it provides:
Building block |
Classes |
Use it to |
|---|---|---|
Step and domain-language bases |
|
Write a step or a domain-language action that delegates its work to another link, with the child link torn down for you |
Value data types |
|
Hold a parsed value in the tagged data cache; subclass one to give it your own tag |
Waiting |
|
Wait a number of engine ticks, or until a condition holds, with a tick limit that fails the scenario |
Test world setup |
|
Start a Play In Editor session from a settings asset and make its world available to your drivers |
World helper |
|
Find the session world, the client worlds of a multiplayer session and the cached play settings |
The data types use tags under ZagalaSpec.DSL.Data.Toolkit.*, available in C++ as ZagalaSpecToolkitTags::DSL::Data::*.
To use it from your own module, add it to your Build.cs next to the core module:
PublicDependencyModuleNames.AddRange(new[] { "ZagalaSpec", "ZagalaSpecToolkit", "GameplayTags" });
Tutorials 8. Create a new step in C++ and 10. Hoverboard in C++ show the Toolkit in use. BlueprintFeature also depends on it, so keep the module when you remove the examples (see Installation).
Note
Upgrading from a version where these classes lived in ZagalaSpecExamples. Existing feature assets and Blueprints keep working: class and enum redirects map the old names to the new ones, and you only need to resave them. In C++, add ZagalaSpecToolkit to your Build.cs, drop the Shared/ prefix from includes (for example ChainLinkOnChainLink/ZagalaSpecChainLinkOnStep.h) and rename UZagalaSpecExamplesPlaySessionSettings, FZagalaSpecExamplesWorldHelper and EZagalaSpecExamplesTickCheckResult to UZagalaSpecPlaySessionSettings, FZagalaSpecWorldHelper and EZagalaSpecTickCheckResult. The data tags moved from ZagalaSpec.DSL.Data.Examples.Shared.* to ZagalaSpec.DSL.Data.Toolkit.*; add one +GameplayTagRedirects=(OldTagName="ZagalaSpec.DSL.Data.Examples.Shared.<Name>",NewTagName="ZagalaSpec.DSL.Data.Toolkit.<Name>") line per tag, under [/Script/GameplayTags.GameplayTagsSettings] in your project’s Config/DefaultGameplayTags.ini, if you stored the old tags in your own assets or settings.
What comes next#
The Toolkit is a starting set, chosen from what the examples needed. It will grow with your feedback, and the most useful requests are concrete ones: a step you wrote twice, a data type you keep recreating, a world or play-session helper you wish existed, or a place where subclassing the bases was awkward. Tell us on Discord or write to support@zagalagamesolutions.com, and describe the scenario you were trying to write. Planned additions are announced on Discord and listed in the changelog when they ship; nothing here is a commitment to a date or a feature.
Configure steps#
Open a step in the Feature Editor and look at its Details.
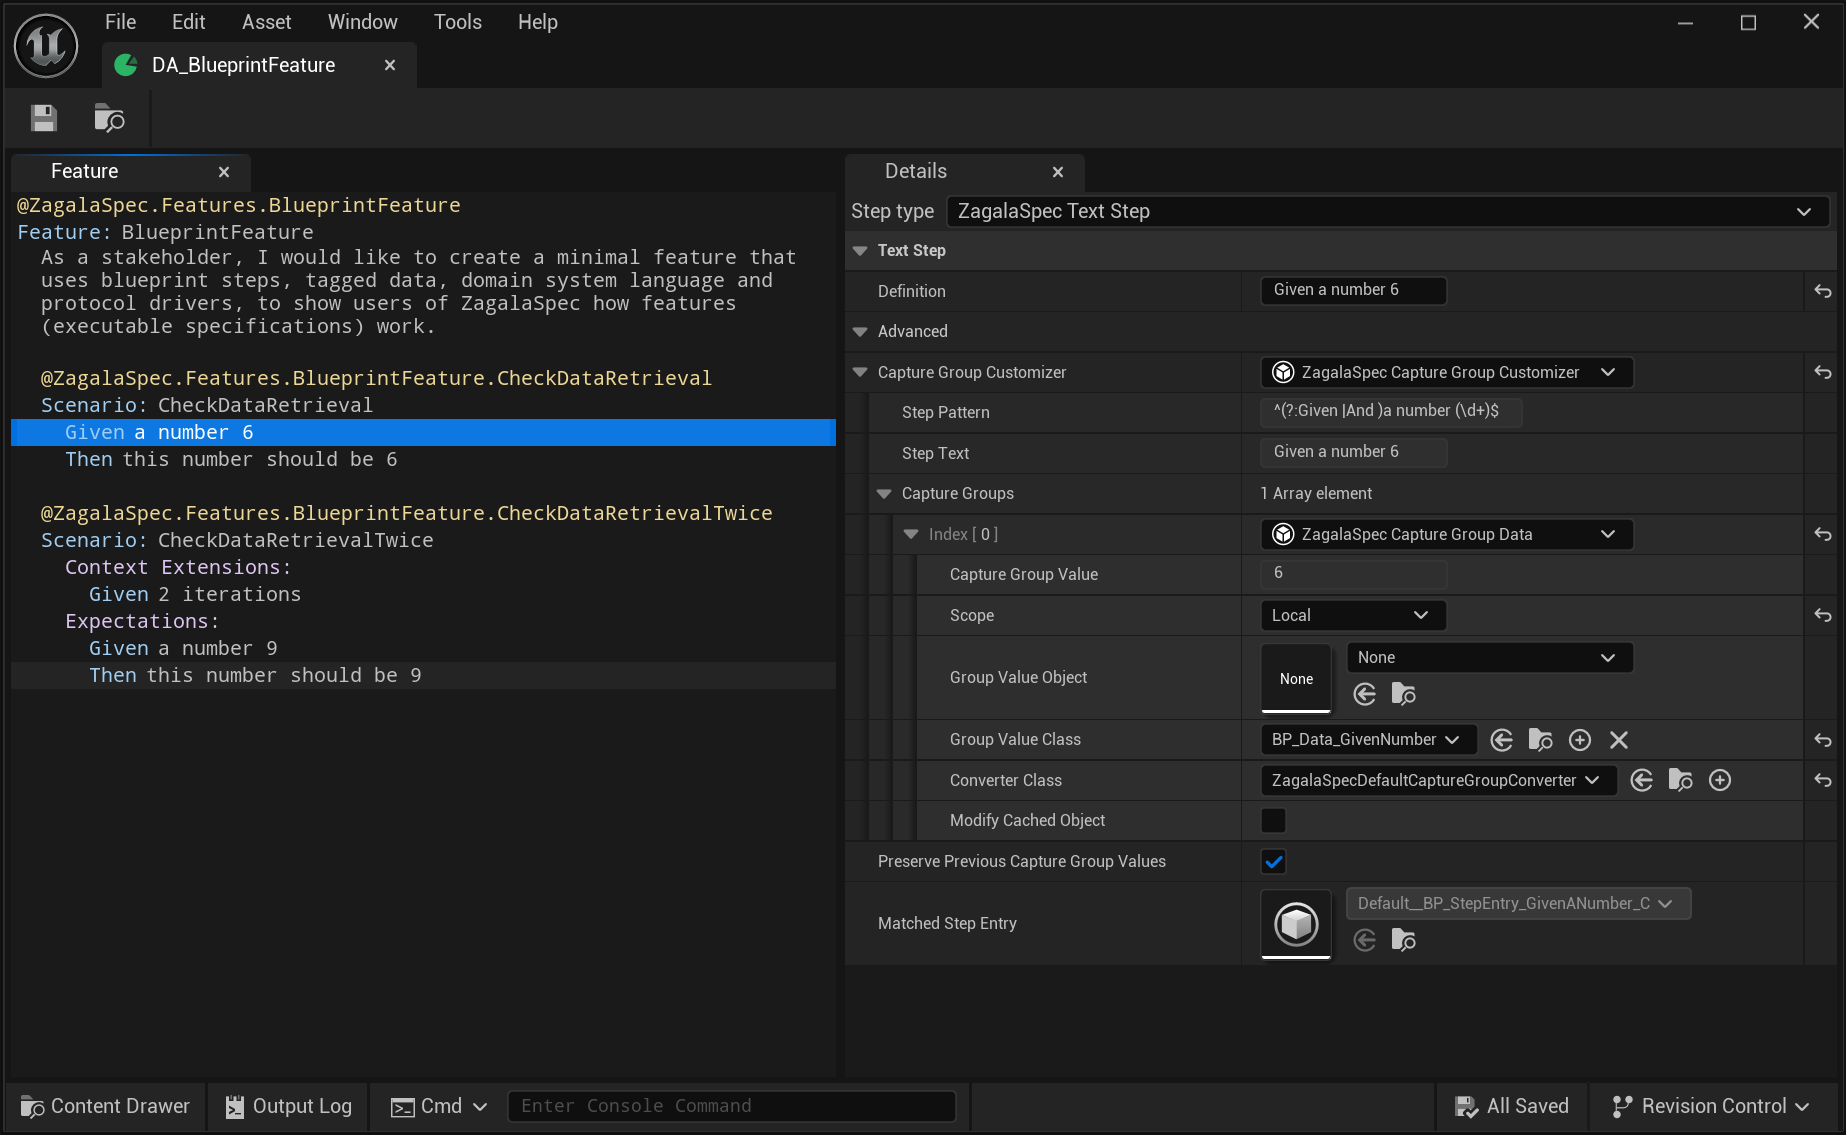
- Matched Step Entry
The step entry whose pattern recognised the sentence. Empty means nobody understands this sentence yet; running the scenario fails at this step. Fix the wording to match an existing pattern, or ask a programmer for a new step entry. Matching runs again half a second after you stop typing.
- Capture Group Customizer
Shows the matched pattern and one Capture Group Data entry per captured value. For each entry:
Capture Group Value: the captured text. Pre-filled; edit it to change the value without changing the sentence.
Scope: Local means this entry decides what the text becomes; Global means the text is a key into Project Settings > ZagalaSpec > Global Capture Group Classes, so the same word resolves to the same class or asset in every step.
Group Value Class: the tagged data class to create from the text (numbers, strings, names), or a Blueprint subclass whose defaults carry a tuned value.
Group Value Object: an asset referenced by the group instead (the examples iterator uses this for its examples asset).
Converter Class: leave the default unless a programmer gave you a custom converter or you created a blueprint from it to specify
ObjectTaggedDataTypeorValueTaggedDataType. SeeZagalaSpecDefaultCaptureGroupConverterfor more details.Step authors normally preset these on the step entry; you only change them when a sentence should carry something other than its literal text.
- Preserve Previous Capture Group Values
Keeps your edited values when the sentence is re-matched. Turn it off to reset them from the text.
Filter scenarios by environment#
Some scenarios only make sense in the editor, or only in a Development build. Give them Filter Tags and ZagalaSpec leaves them out of the test list when the environment does not match.
Select the scenario and open the Advanced section of its Details panel.
Add tags under
ZagalaSpec.ScenarioFilter:ZagalaSpec.ScenarioFilter.Require.<Name>: run only when the environment is active.ZagalaSpec.ScenarioFilter.Exclude.<Name>: never run when the environment is active.
Save the feature. The tags are stored in the project settings, so the test list never has to load the scenario.
Built-in names: Editor, Game, Debug, DebugGame, Development, Test and Shipping. For example, Require.Editor runs a scenario only inside the editor, and Exclude.Debug skips it in Debug builds.
A scenario with no filter tags always runs. Exclude always wins over Require. When a scenario lists several Require tags, add one rule tag to pick the logic (conflicting rule tags log a warning and the stricter one is used):
Tag |
Meaning |
Default |
|---|---|---|
|
Within one filter, any Require tag may match (OR) |
Yes |
|
Within one filter, every Require tag must match (AND) |
|
|
Every filter with a Require tag must be satisfied (AND) |
Yes |
|
One satisfied filter is enough (OR) |
Filtering applies only when tests are listed (the Session Frontend and Automation RunTests). Excluded scenarios are reported in the log under LogAutomationController. Filter tags are not part of import or export. The bundled Networking feature uses Require.Editor; see 12. Multiplayer in the editor.
To add your own environment, create a class derived from ZagalaSpec Default Scenario Filter (C++ or Blueprint), override Get Environments and Is Environment Active, and add it to Scenario Filter Classes in the settings. Define matching Require.<Name> and Exclude.<Name> tags.
Run features#
In the editor#
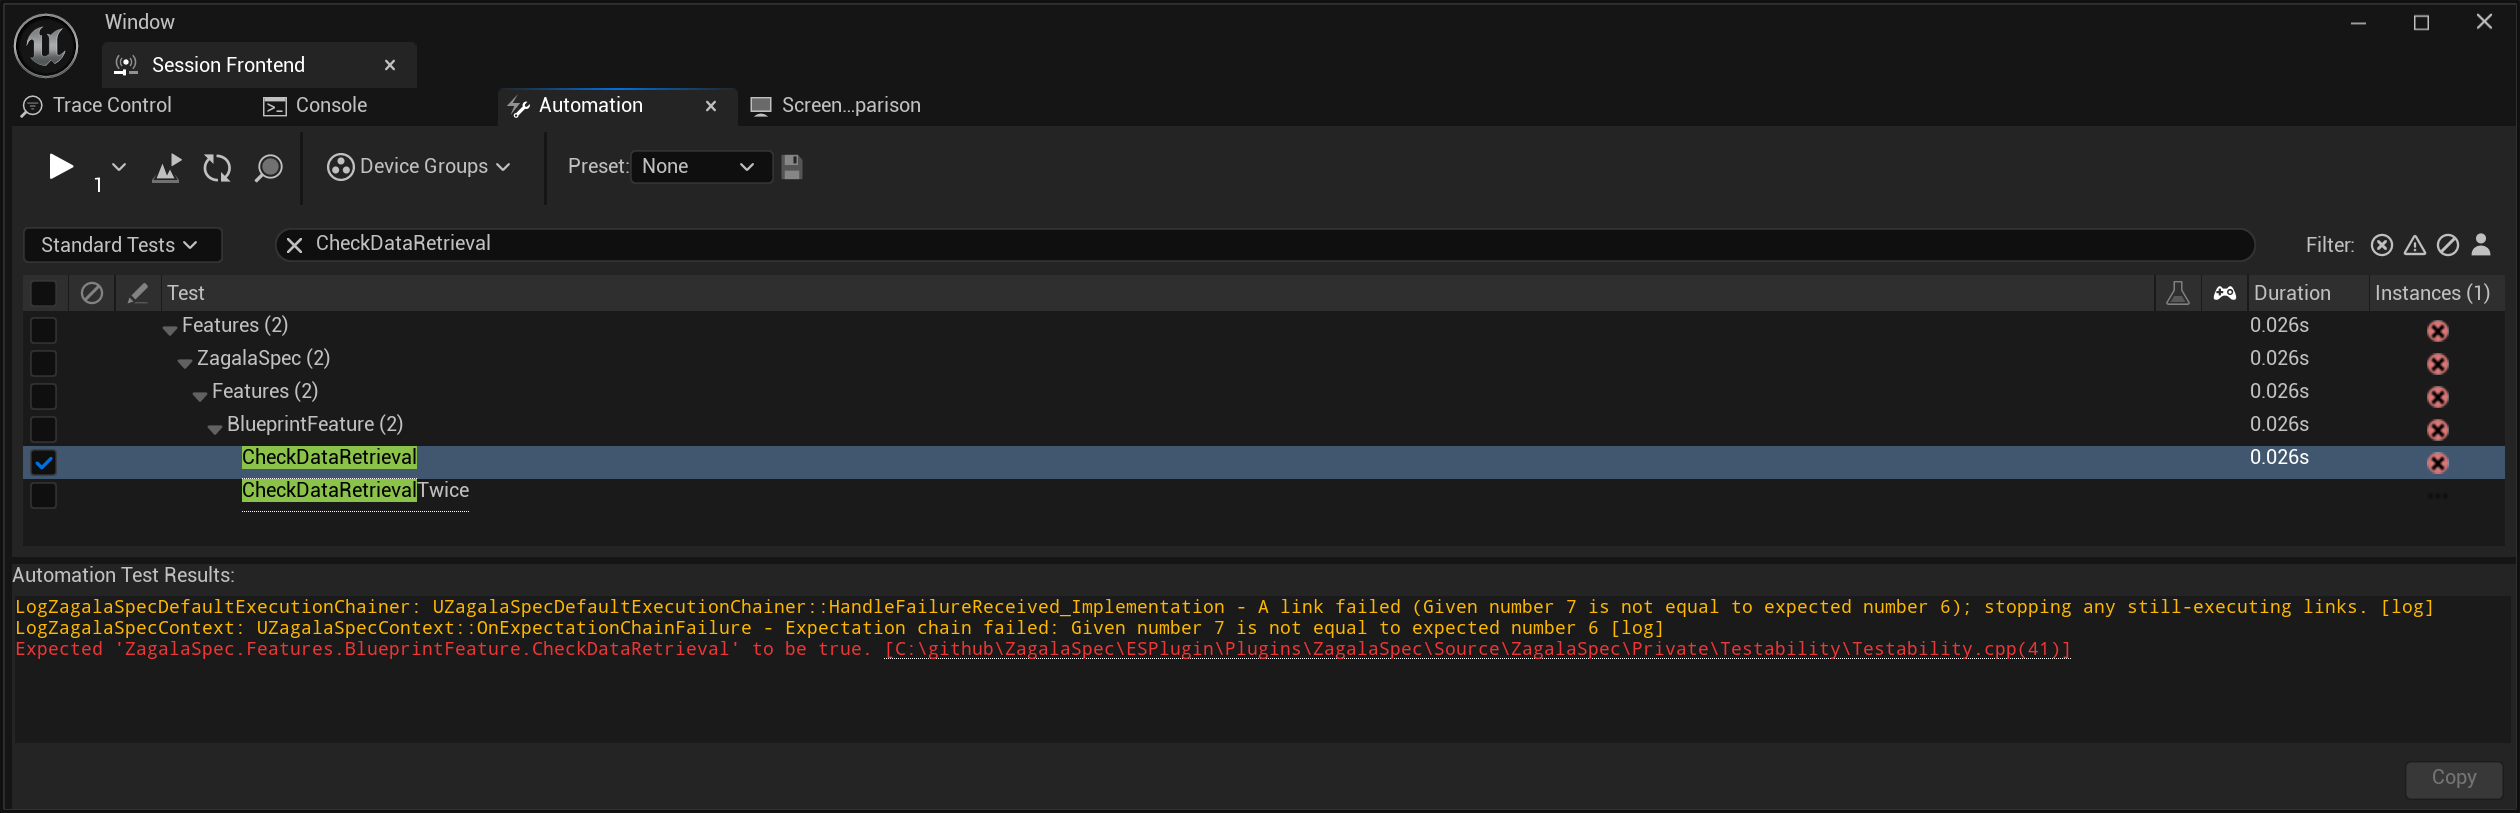
Tools > Session Frontend > Automation.
Search for
Features.followed by your feature tag, for exampleFeatures.ZagalaSpec.Import.Features.Counter.Tick what you want and press Start Tests.
Each scenario is one test named Features.<scenario tag>. For a single scenario while editing, use the Check button in its Details instead.
From the command line or CI#
& "C:\Program Files\Epic Games\UE_5.6\Engine\Binaries\Win64\UnrealEditor-Cmd.exe" "C:\Projects\MyGame\MyGame.uproject" `
  -ExecCmds="Automation RunTests Features.+; Quit" `
  -unattended -nullrhi -nop4 -nosplash -log `
  -ReportExportPath="C:\Projects\MyGame\Saved\TestReports"
Automation RunTests <prefix>runs every test whose name starts with the prefix; useFeatures.+for everything or a full scenario name for one.-nullrhiruns without a window or GPU. World-based features (Hoverboard, Checkpoint, Networking) work headless: they start Play In Editor internally.-ReportExportPathwritesindex.jsonand per-test JSON you can parse in CI; without it, results go to the log only.The process exit code is non-zero when any test fails.
On Linux and macOS the executable is UnrealEditor-Cmd under Engine/Binaries/Linux or Engine/Binaries/Mac/UnrealEditor.app/Contents/MacOS, with the same arguments.
Read results#
Green scenario: every step broadcast success.
Red scenario: the first failing step’s reason is shown in the Session Frontend’s message pane and in the report, for example
Expected 7 but counter value is 6.Output Log (Window > Output Log), filter
LogZagalaSpec: the context logs each step as it starts and finishes, chainers log which link failed, and the registry logs duplicate or unmatched patterns.
A scenario that never finishes means a step never broadcast; see the FAQ entry A scenario never finishes.
Export features#
Right-click one or more Feature assets in the Content Browser. The ZagalaSpec Export section offers:
Export as Gherkin (.feature)
Export as SpecFlow (.feature) (adds the
# language: enheader)Export as Robot Framework (.robot)
Export as Gauge (.spec)
Export as FitNesse (.wiki)
Export as ZagalaSpec (.zagalaspec)
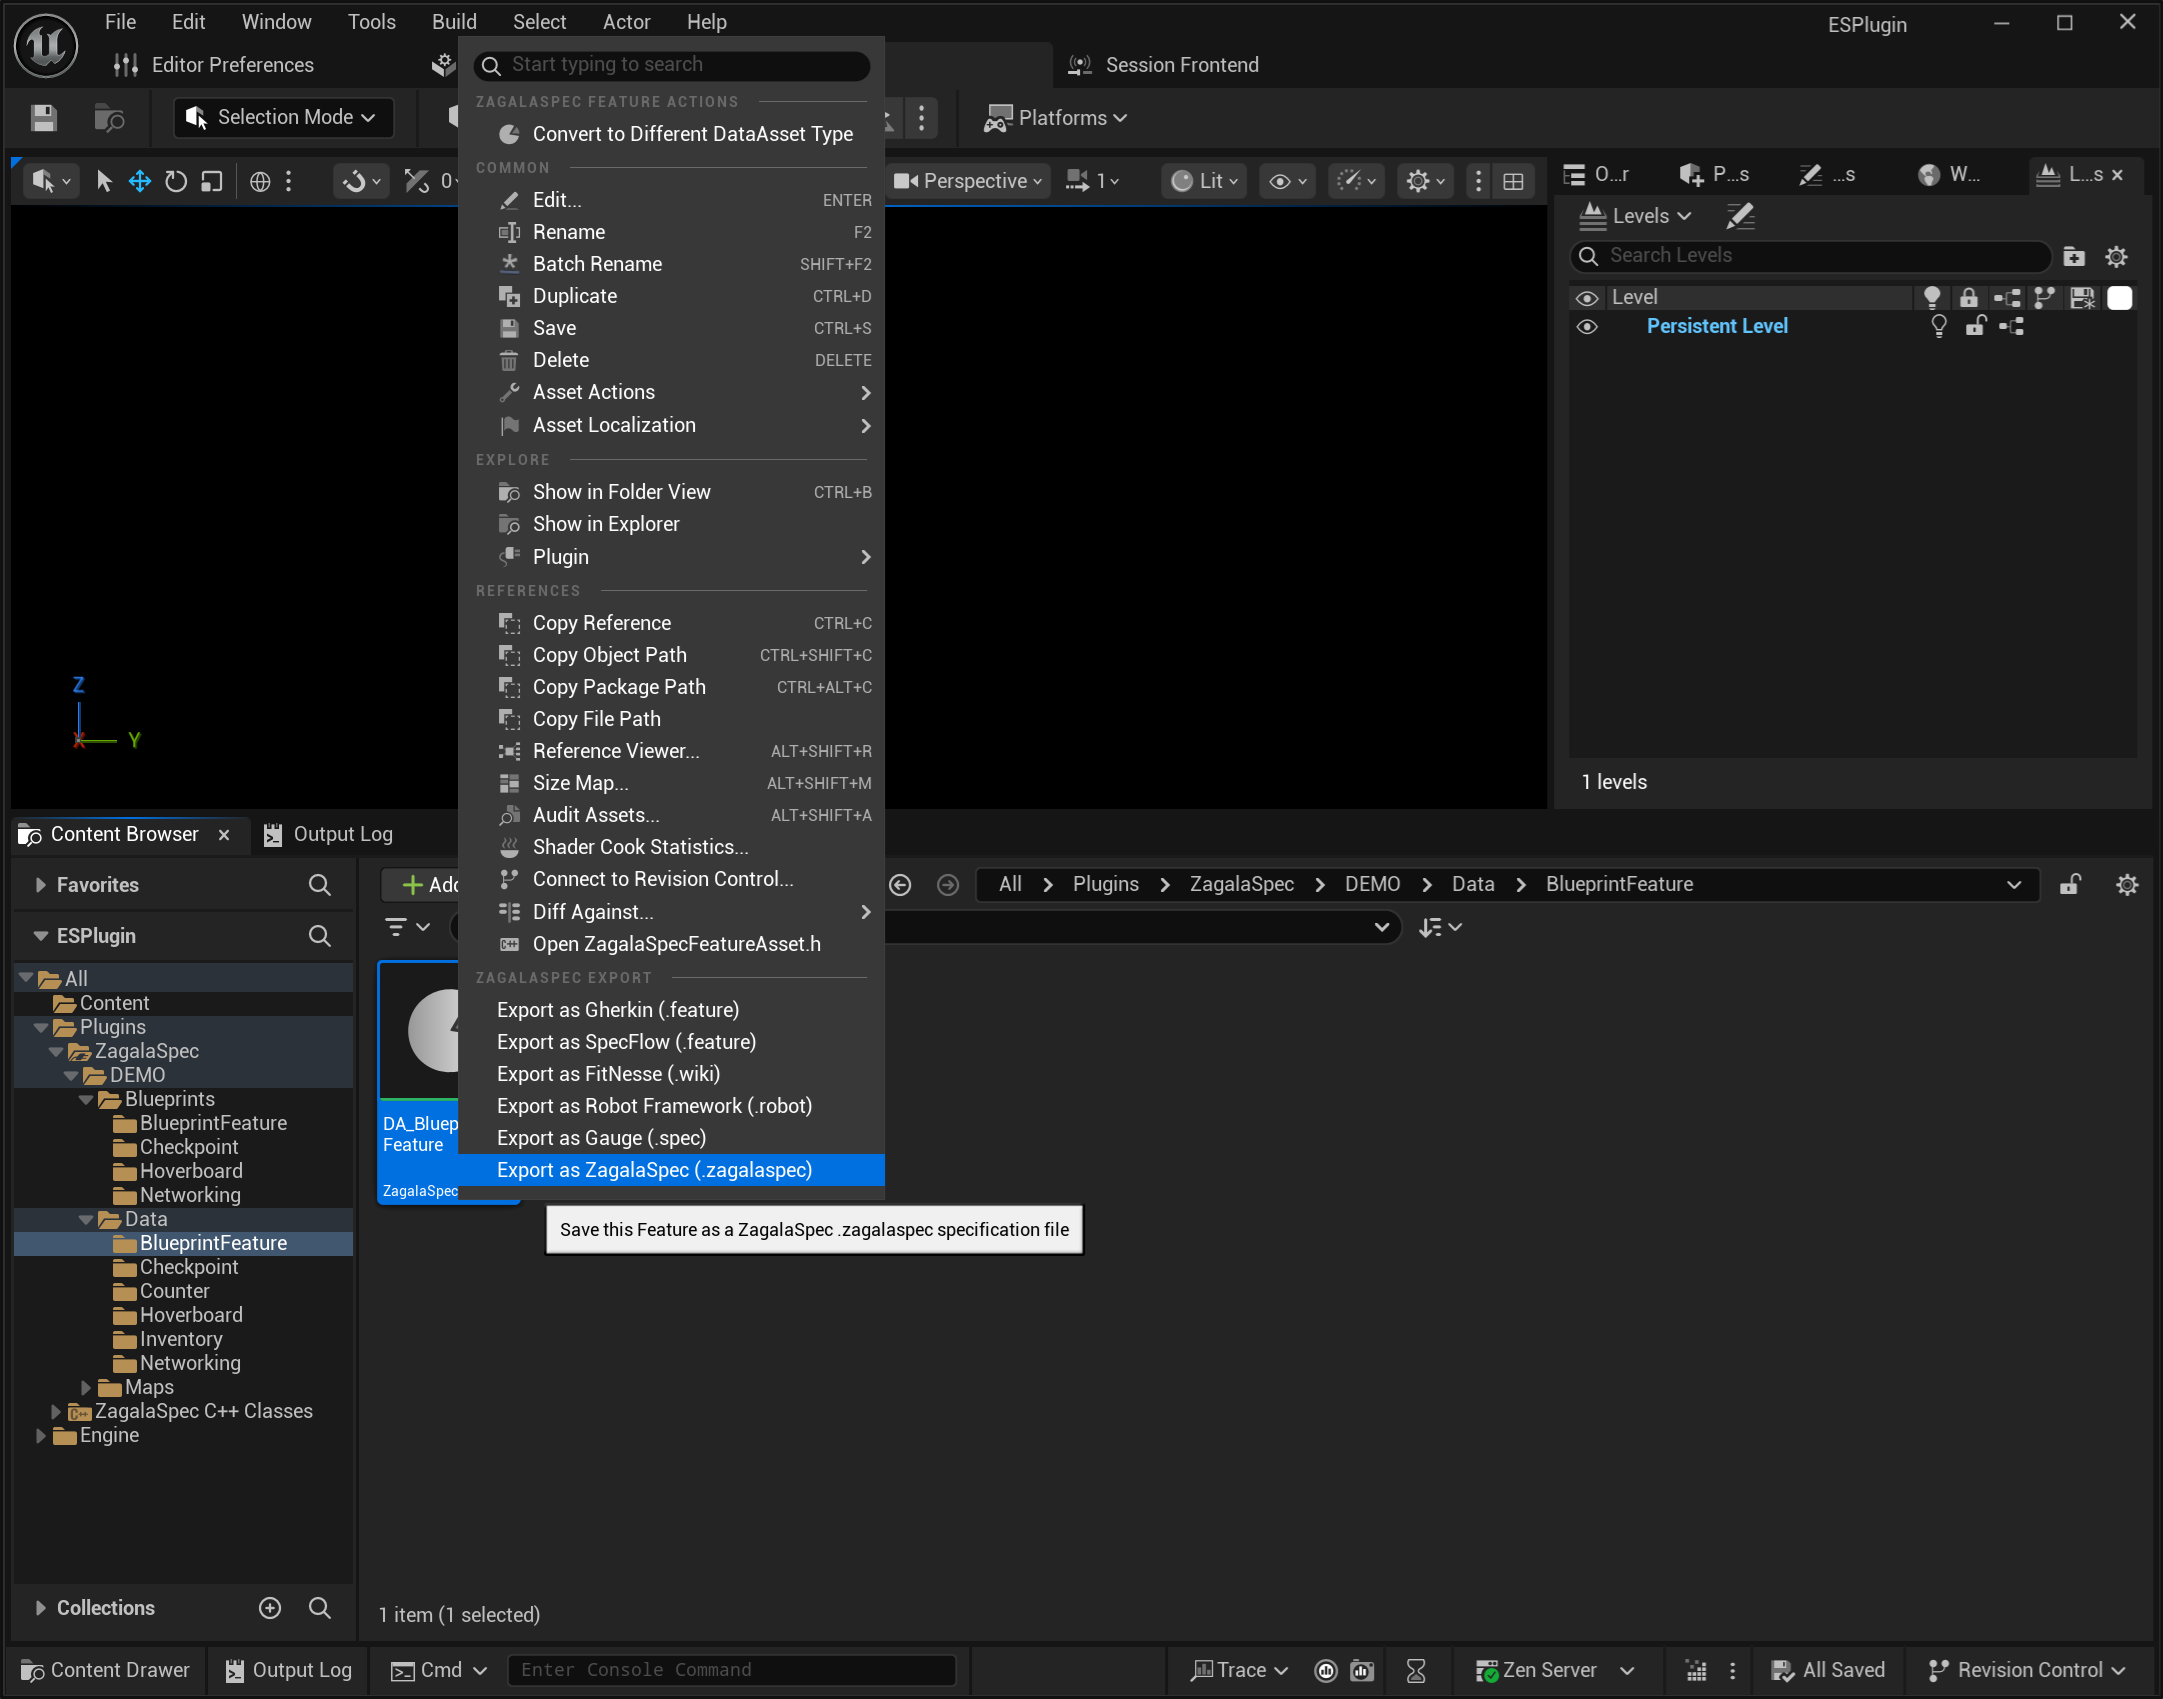
Each export writes the sentences, descriptions, tags and shared setup. Capture group configuration is not exported: it belongs to the asset. Use .zagalaspec when you want to re-import later without loss; use the others to hand a readable copy to people who work in those tools.
Keyword phase (Given/When/Then) is inferred from the first word of each sentence using the lists in Project Settings > ZagalaSpec Import/Export > Step Phase Keywords; a sentence that starts with none of them is exported as Given.
Console equivalents (Output Log or -ExecCmds):
ZagalaSpec.Import <gherkin|robot|fitnesse|gauge|zagalaspec|all> <file or folder paths...>
ZagalaSpec.Export <gherkin|specflow|robot|fitnesse|gauge|zagalaspec> <feature tag or parent tag>
Settings reference#
Open Project Settings and search for ZagalaSpec.
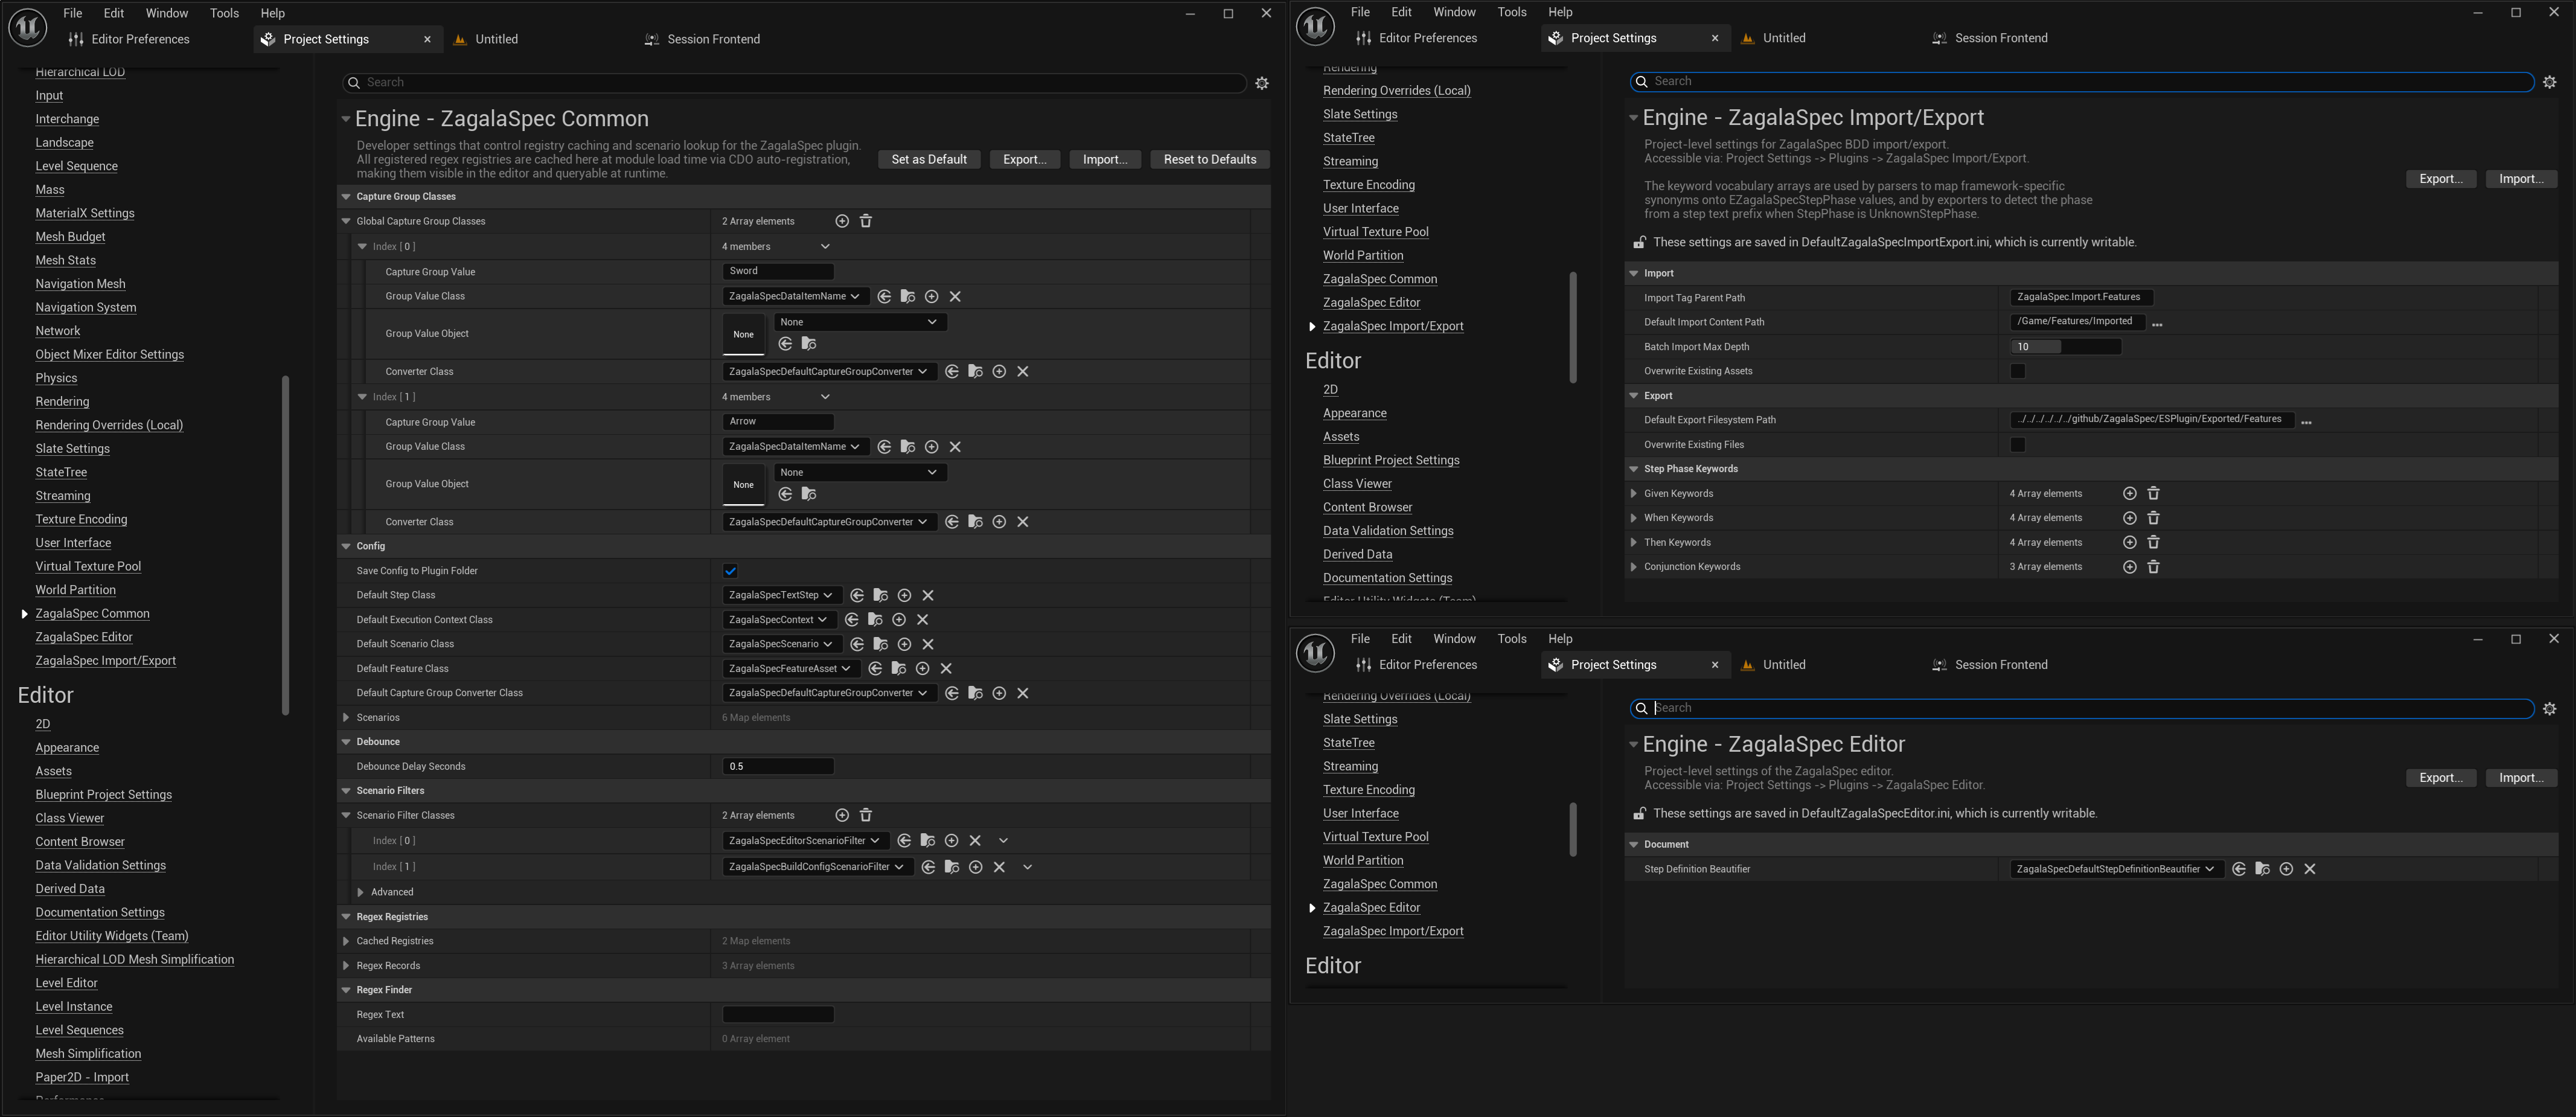
ZagalaSpec Common
Global Capture Group Classes: the table used by Global-scope capture groups (key text → class, object, converter).
Debounce Delay Seconds: delay before a text step re-matches after editing.
Save Config To Plugin Folder: untick it so the scenario and step registries are stored with the project (see Installation).
Default Step / Scenario / Feature / Execution Context / Capture Group Converter Class: what the editor creates when you press +.
Scenarios, Features Map, Regex Records: read-only views of what is registered, useful when a test is missing from the list.
Scenario Filter Classes: the filters applied when tests are listed (defaults: editor and build configuration).
Scenario Filter Tags Map: read-only cache of each scenario’s filter tags, refreshed when a feature is saved.
ZagalaSpec Import/Export
Import Tag Parent Path: the parent tag under which imported features are placed (default
ZagalaSpec.Import.Features).Default Import Content Path: the default location for content to be imported.
Batch Import Max Depth: the maximum folder depth to traverse during batch import.
Overwrite Existing Assets: whether to replace existing assets during import.
Default Export Filesystem Path: the default location for exported files.
Overwrite Existing Files: whether to replace existing files during export.
Step Phase Keywords: the keywords used to identify different phases of a step.
ZagalaSpec Editor
Step Definition Beautifier: the class that turns a step class name into the text shown in the Feature Editor for native steps. The default drops a Blueprint prefix up to the last underscore, the
ZagalaSpecprefix and the step role (Step,CE,DSL,PD), then splits the words:ZagalaSpecStepAddItemandStep_AddItemboth read Add Item. Pick your own class (C++ or Blueprint, built from the ZagalaSpec|Step Definition string helpers) when your steps follow another naming convention, or clear the field to show raw class names.
Under the hood
The execution path is UZagalaSpecFeatureAsset → UZagalaSpecScenario → UZagalaSpecContext → UZagalaSpecDefaultExecutionChainer (one for extensions, one for expectations) → execution steps → your system under test.
A text step (
UZagalaSpecTextStep) resolves its class throughUZagalaSpecStepRegistry; a native step (UZagalaSpecNativeStep) names the class directly. Both implementIZagalaSpecConfigStepand produce anFZagalaSpecStepCreationDatathat the context turns into a live step withUZagalaSpecStepFunctionLibrary::CreateExecutionStep().Step entries are
UZagalaSpecRegexStepEntryobjects (C++ CDOs or Blueprint assets) mapping one pattern to oneIZagalaSpecExecutionStepclass.Execution steps derive from
UZagalaSpecDefaultExecutionStep, read capture groups throughAddLocalSetupDataToCache()and finish withBroadcastSuccess()orBroadcastFailure().The automation test is
FFeaturesTestin the core module; it readsUZagalaSpecFeatureSettings::ScenariosMapand names testsFeatures.<tag>.
See the API reference for every class.